
A Star Trails Tutorial
Star trails photography can be fairly overwhelming to beginning photographers and veterans alike. Here I will be outlining some of the key elements needed to produce exciting star trail images. Feel free to follow me on Facebook as well for more updates.
So you ask how is it done?
To produce a star trails image you need to take several 30 second exposures in a row (no breaks in between as they leave gaps in your trails), on the order of 50+ images to really start to see the desired results. You can read my Landscape Photography 101 posts for more detailed information on long exposure photography.
What you will need:
- A DSLR Camera
- Remote shutter release (a must for star trails)
- Tripod (a very sturdy one with no shake or movement)
- Clear skies with limited light pollution
- Post editing software (Adobe LR4 and Photoshop CS6 are my tools of choice but there are a number of third party apps)
- Time (lots and lots of time)
How to Prepare
The most important step in this whole process is finding a great location with limited light pollution and clear skies. I often use the National Weather Service to check regional forecasts. Finding dark skies can be very challenging (especially in Washington) but they are a must for star trails. The go-to website that I use to locate dark night skies with limited light pollution is called the Dark Sky Finder. This website is extremely useful and very easy to navigate. The brighter the color is on the map, the worse the conditions are for shooting the stars. Look for locations that have no color or are blue/green in color. These areas will provide the best viewing of the Milky Way and the stars in the sky to make for an optimal star trails photograph.
Getting the Shots
- Set your camera up on your tripod and then set your lens to the widest possible zoom and the focusing ring to infinity. Doing this will allow for your widest field of view (more stars) and also it will ensure that your photo is in focus.
- Connect your remote and take some 10-15 second test shots to determine how high your ISO needs to be and where you would like your camera to be positioned. Remember to set your aperture to the lowest possible number to let the largest amount of light in (f/2.8, f/1.4 etc.), you really need to have a very fast lens to do this type of photography.
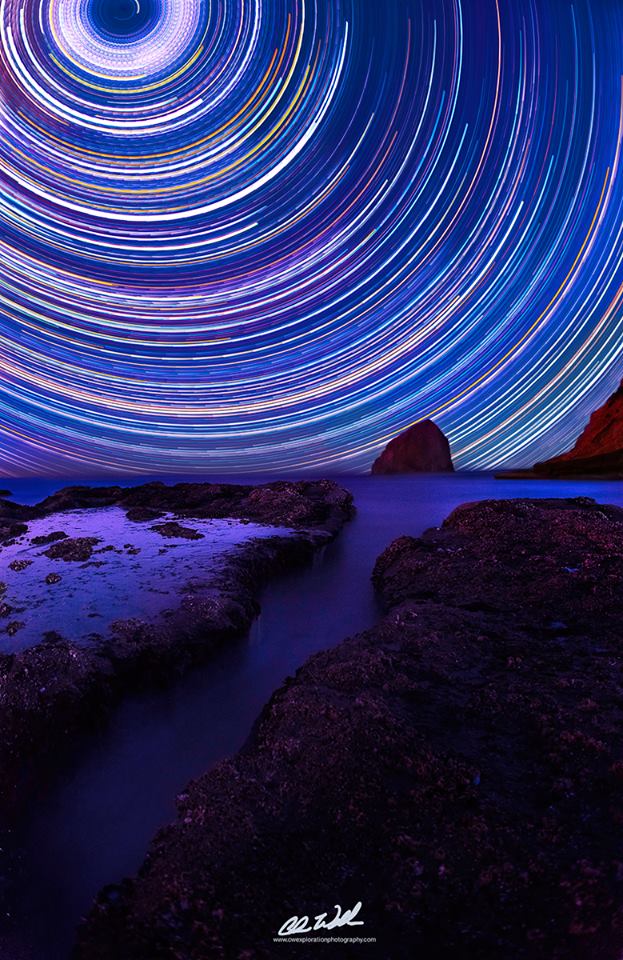
- Use a Star Finder app or map to look for the Milky Way or your object of interest. If you are able to see the North Star point your camera toward it if composition allows as you will obtain complete star circles in the compiled star trails photo (think of it as a central point of rotation).
- After making your adjustments make sure to adjust your exposure time by using the rule of 600. I typically shoot my photos using these settings: 16mm, f/2.8, ISO 1600-2500 (depends how much light pollution is present) and 30 seconds.
- Now comes the fun part; waiting. You need to take a minimum of 50 photos to gain the desired effect, so patience is a must!
Editing
LR4
Editing can be a very grueling process, you need to make absolutely sure that every photo is edited in an almost identical manner (compensating for light on the earlier images at the beginning of your shoot). You can do this using batch editing techniques in Adobe LR4 by simply selecting a number of photos by holding down the shift key and then using the Paste feature. After you are done editing you can export the photos (jpgs) to your favorite stacking app or program (I use Photoshop CS6). You can literally do all of this in CS6 but I like the ease and simplicity of Lightroom 4 for post processing.
CS6
To bring your photos into CS6 choose ‘File’ then ‘Scripts’ and then select ‘load files into stack’ and browse for your files then click ‘open’. Don’t bother aligning them as they should be perfect. The images will load in the bottom right column of the screen. Select the top photo, scroll down and click the last photo to highlight all of the desired layers. Now select ‘lighten’ and let CS6 do its magic. After the photo is produced you can select which layers you would like to eliminate and polish the final product. To finish flatten the image and save and export it as a jpeg. Check out Youtube for some awesome tutorials.
Feel free to follow me on Facebook as well for more updates, email me at cwexplorationphotography@gmail.com for questions and print inquiries.